Creating Bookings
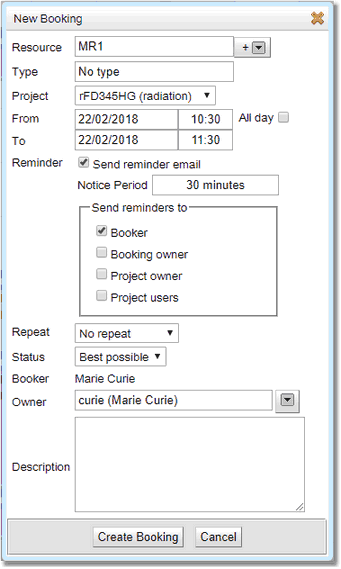
To create a new booking, in the Bookings Calendar, navigate to the date that the booking needs to appear on. Then either single-click in the calendar at the time when the booking is to start, or click-and-drag to select both the start and end times of the booking. Both methods will cause the booking pop-up to be displayed:
This pop-up is where the details of bookings are viewed and can be edited. Depending on the configuration of Calpendo, some of the fields displayed in this pop-up may not be editable, such as the Status and Owner. If the user is not allowed to make repeat bookings, then there won't be an entry for the repeating information shown in the pop-up. Also additional fields may be present if added by the administrator.
|
Every booking must have a resource, so select which resource to make a booking for. If the bookings calendar had only one resource displayed, or the resources are displayed in separate columns, then the resource will have been automatically selected, but it can still be changed to allow booking for some other resource. The default is to display the list of resources currently selected for display on the calendar. If this needs to be changed, click on the pop-up next to the resource box and choose what and how the resources will be displayed. |
|
Deselect the Show only Selected Resources to show all resources.
Select Show resources by type to show the resources in a drop down by type. This option will only be available if the administrator has Configured Types and Groups for the resources.
Select Show resources by location to show the resources in a drop down by location.
Then click back on the Resource box to get the new list of resources to be chosen from.
Note that a booking is made for a resource that's not currently being shown in the calendar, then the calendar will automatically display all bookings for that new resource.
The administrator may have set up Booking Types in which case choose the type of booking, different booking types may be displayed in different ways on the calendar.
Some resources require a project for all bookings, and other resources do not. If a resource is selected that doesn't require a project, then the project selection will be hidden. The list of projects shown, will only be the projects the user is associated with. If the user is not associated with any projects, then a booking cannot be made for a resource that requires projects. The administrator can specify that a project can only book a resource if that project has an entry in its resource settings for the relevant resource. this is specified in the Resource Editor.
The time and date of the original selection are shown, but these can be changed before saving the booking. A booking that is set up to be All day will display at the top of the day column making it ideal for holiday notifications etc. If predefined booking slots are being used then the time in the pop up will match the slot available where the calendar was clicked. The times can be changed, but may not be allowed to be saved due to the Predefined Booking Rule. Bookings can go over multiple days.
Now set whether to get an email reminder and whether the booking is repeatable. See below for more information on how to set these up.
The status will default to Best Possible. This means that the best possible outcome will be attempted from Approved, Requested or Denied. If there is no Time Template available and the user is not denied by a Booking Rule or Permission, the Default Booking Status set up in Global Preferences by the administrator will be used. This choice can be overridden by using the drop down menu, although this choice may be overridden in turn by Time Templates, Booking Rules or Permissions. If there is a Time Template available and it issues a Warning or the booking is deemed Acceptable then Best Possible becomes Requested. For more information on how Time Templates restrict bookings read the section on Time Templates in the Booking Restrictions chapter.
The table below will show for each type of possible Booking Status and Time Template combination for a standard user, what final Booking Status will be applied to the booking. These results may be altered by any Booking Rules and Permissions that affect bookings.
Initial Chosen Booking Status |
Time Template Available |
Final Booking Status
|
|---|---|---|
Best Possible |
No Time Template |
|
Warning Template |
Requested |
|
Acceptable |
Requested |
|
Auto-Approval |
Approved |
|
Requested |
No Time Template |
Requested |
Warning Template |
Requested |
|
Acceptable |
Requested |
|
Auto-Approval |
Requested |
|
Tentative |
No Time Template |
Tentative |
Warning Template |
Requested |
|
Acceptable |
Requested |
|
Auto-Approval |
Approved |
|
Approved |
No Time Template |
Permission denied |
Warning Template |
Permission denied |
|
Acceptable |
Permission denied |
|
Auto-Approval |
Approved |
The description field is a place for you to enter any text that describes your booking or is required as a comment.
Notice that the Create Booking button in the previous diagram is greyed out. This is because every booking must have a resource, and there is no resource selected yet. Similarly, if a resource is selected that requires a project, but a project is not selected, then the Create Booking button will be greyed out. Calpendo may also detect that the selected values are prohibited by the Permissions that have been configured. If this happens, then again, the Create Booking button will be greyed out.
Once all the details have been entered and Create Booking has been pressed, then the new booking will be sent to the Calpendo server. Once there, it will undergo more tests to make sure that the booking is valid. An error message will appear if it is not allowed, a warning message if it is allowed, or the booking will be quietly accepted. Use Cancel to cancel the booking process.
Bookings that are created may be made as requests, or they may be auto-approved. This depends upon the configuration of the Calpendo and is described further in Booking Restrictions.
Bookings can be copied and pasted, for fast entry of similar bookings. Just click on a booking in the calendar and select Copy from the pop up menu. Then, when the calendar is clicked somewhere to create a new booking, if there is a booking in the clipboard, its content will be used to populate the booking pop-up. It can then be edited as required.
Calpendo can send an email to remind about bookings that have been made. Tick the Send reminder email box in the booking pop-up to see the reminder options. The default reminder options are taken from the personal booking reminder settings.
The notice period indicates how far in advance of the booking the email is to be sent.
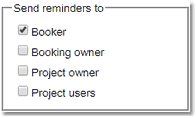
Then choose who gets a reminder email, with the options being: •The person that made the booking. •The person that owns the booking. •The person that owns the booking's project. If there is no project on the booking, then this setting is not shown. •The people associated with the booking's project. If there is no project on the booking, then this setting is not shown.
|
If a person falls into more than one category they will only receive one reminder email, for example the project owner is also the person that made the booking. Reminders are not sent to users who can no longer login unless their status is set to Lurker.
If repeat bookings are allowed, then the Repeat option will be viewable. Select the type of repeat and then set the configuration options for that repeat type.
When creating a booking it can be set up to automatically repeat. There are a number of repeat choices:
Daily: Repeats at the same time each day.
|
|
|
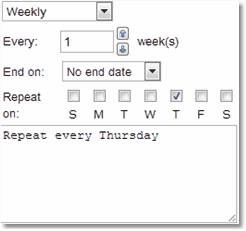
Weekly: Repeats each week on this day at the same time. Specify which days the repeat will occur on by selected the appropriate tick boxes.
Monthly by date: Repeats each month on a particular date.
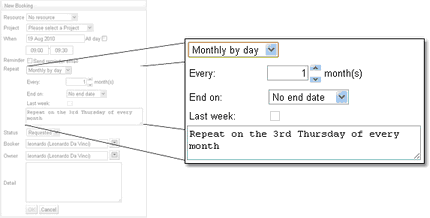
Monthly by day: Repeats each month on a particular day, this could be defined for example as: "Repeat on the 4th Monday of every month"
Annually: Repeats on the same date each year. |
Once the type of repeat required has been selected, then choose how often the repeat occurs, every month, every other month etc.
Also define an end date for the repeated bookings.
If the repeat is Monthly by day and a day towards the end of the month has been chosen, the Last week enables swapping between the two possible options.
e.g. "Repeat on the 4th Monday of each month" and "Repeat on the last Monday of each month".
The description box at the bottom gives a written definition of the repeat that has been defined allowing the choices to be checked to make sure they are correct.


