Creating Projects
To create a new project, go to the menu option Projects-->Create Project.
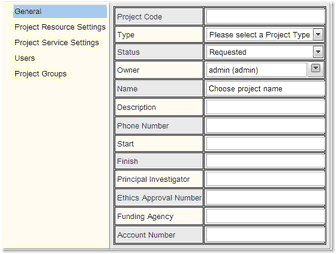
The content viewed when creating a new project will vary depending on how the systems administrator has configured Calpendo. By default each project contains the following:
Property |
Description |
|---|---|
Project Code |
This is an identifier that will be assigned by an administrator. These should be unique, but projects may not have a project code assigned to them until the project approval process has completed. |
Type |
The facility may, or may not, classify projects by type. If types are configured for use, then the user will be able to select the type that should be used for your project. |
Status |
Newly created projects will have a status of Requested. The user will probably not be able to modify the status of their own projects, but this depends on how the Permissions are configured to allow access. |
Owner |
The owner of a project is normally the person that created the project request. The user may be able to select a different owner, but the administrator may also reassign the ownership of a project. Owners can also use the project for booking without being in the user list. |
Name |
This should be a short text description of the project. The maximum length that this can be will have been configured by the administrator. |
Description |
This is a longer description of your project. |
Project Resource Settings |
This specifies the resources that the project can book, and provides a place to store some information relating to what will be used. For example, this may record how much the project will be charged for using each resource or how much time in total is allowed to be booked for the project. |
Project Service Settings |
This specifies the services that the project can order, and provides a place to store some information relating to what will be used. For example, this may record how much the project will be charged for ordering each service. |
Users |
This specifies all the users that are allowed to make bookings on behalf of the project. |
In the default system the following properties are also on Project, but may be removed or used as required.
Property |
Description |
|---|---|
Phone Number |
Phone number to be associated with the project. |
Start |
Start date of the project. |
Finish |
Finish date of the project. |
Principle Investigator |
The main investigator of the project. |
Ethics Approval Number |
The Ethics Approval Number for the Project. |
Funding Agency |
Name of the funding agency. |
Account Number |
Account number for the funding. |
Once the relevant information has been filled in, press the Submit project request button.
The administrator may have added a number of other pieces of information that need to be completed for a project to be created. If there are problems filling out the project creation form please talk to the Calpendo administrator.
The process of approving projects can vary a great deal between different Calpendo installations. The administrator should be able to tell the user about the process that's in place at the facility. However, in all cases, a project becomes available for booking once its status is changed to Approved.
See The Project Approval Process for information on the options for approving projects.
As soon as a project request has been created, it will appear on the My Projects page.
Here is an example of creating a project, click on Create Project,
Project creation starts with the General tab. Fill in the form and then move on to the other tabs. |
|
|
|
Click on Choose Resource to get a pop up which will allow the choice of resources to be used for this project. View the section on Resource Selection to see how to select resources using this pop up. |
|
Click on Project Service Settings to get a pop up which will allow the project manager to choose the services available to be ordered by this project. |
|
The current user name will appear automatically in the user list. Use the drop down to select other users to be added to the list.
To remove a user, tick the option box and click Remove. |
Now submit the project request using the Save button.
The Project Groups tab cannot be used until the project is initially saved.


