The User Requests Page

Contents
The User Requests page shows users whose status is Requested. By default, the User Requests page appears on the menu here:

However, your administrator may have configured the menus differently.
This is what the User Requests page looks like when some users are awaiting approval:

As described in The User Approval Process, approving or denying new users means changing their status. The top part of the User Requests page provides a quick way to do just this. Tick the check box next to each user whose status to be changed.
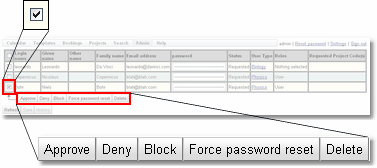
Note that as soon as there are any users checked, then the checked button bar changes so that it is no longer greyed out.
Now press any of these buttons to Approve, Deny, Block, Suspend or Delete the ticked users. Press Force password reset to allow the users to log in, but force them to change their password.
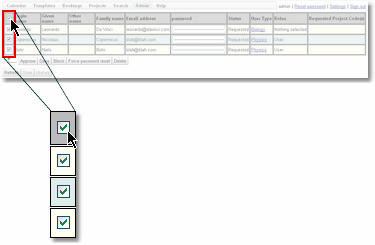
Alternatively, tick the check box in the table's header and every check box will be ticked (or unticked, as appropriate) as a short-cut to ticking all users.
Changing More Than A User's Status
The User Requests page can be used for more than just changing a user's status. First, click anywhere in the user's row apart from the check box. The user's details will appear at the bottom of the page already in edit mode, and the values can be changed as required. It is useful to define the users roles at this point. A new user can be assigned any role the person doing the assigning has. If the assignee has Admin, Guest then they can assign Admin and Guest roles to another user.

Choose the status you want the user to have from the drop-down.
There is no difference between selecting a status here and using the buttons in the checked button bar.
When finished, press the Save button. A pop-up will appear briefly in the bottom right corner to indicate the user was saved.

Although we have now changed this user's status, it still appears in the table of user requests. However, the status shown in the table has changed. A user will remain in the User Requests page until the Refresh button is pressed, or the browser is refreshed.

Changing The User's Group Membership
To associate the user with some users groups, first select the user's row, as shown above in Changing More Than A User's Status, and then click the Groups tab.

The check boxes indicate what groups this user is a member of. New users will not be a member of any groups, so no boxes are checked. Tick the check boxes next to the groups this user needs to be a member of.

Once all the required user groups are chosen, press the Apply button. Once done, a pop-up showing the number of user groups that have been changed will appear.

The user does not need to save the user information if only the group memberships have changed. That's because group memberships are a property of the User Group and not the User, and it's also why there's a separate Apply button to save the group membership changes.
A number of users can be added or removed from a group at once using the options on the Checked Menu called Add To Group and Remove From Group. Once the users to be added/removed from a group are all checked, click the appropriate button and choose the group for the selected users to be added/removed.