Report Manager

Contents
The Report Manager page allows the management of reports within Exprodo SDM. By default, it appears under the Search menu, with a sub menu item labelled Reports. However, the menu may have been configured so that the Reports page is not visible by the administrator.
Once useful searches have been created they can be saved for future use as reports (see Saving and Reusing Searches). The reports page allows you to view, manage and schedule your reports as well as creating new ones.
The page is split into two. On the left is a list of the System Reports (those that anyone can see) and the users Personal Reports. On the right is the area where to edit, schedule and create reports, when the user enters the Reports page this area is initially empty. Select a report in the left hand pane to see the properties of that report in the right hand pane. Where the page splits can be moved to change the space available for each of the sides.
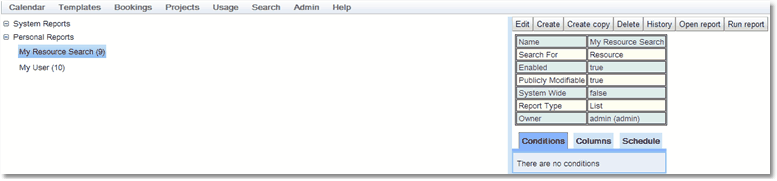
A report has a number of basic properties:
Property |
Description |
Name |
The name of the report as assigned by the user. |
Search For |
The biskit type that will be searched for. |
Enabled |
If the report will run if scheduled. |
Publicly Modifiable |
If a system wide report then anyone can modify it. |
System Wide |
Can everyone see the report or is it a personal one. If this is true the report will appear under System Reports rather than Personal Reports. |
Report Type |
|
Owner |
The user who created the report and if Publicly Modifiable is false, the only person who can edit a report if it is also System Wide |
Page Token |
Records which page the report was created with. |
and tabs to see other properties:
Tab |
Description |
Conditions |
The conditions (if any) associated with the report. (see the Setting Search Conditions chapter for more information about conditions and how to edit them) |
Columns |
The columns that will be displayed in the report |
Schedule |
Whether the report is scheduled to run and, when it will run, who the report will be e-mailed to and the format of that e-mail. |
The Menu Bars
The menu bar has two variations. In View mode:
![]()
after you press the Edit button and enter edit mode:
![]()
For a complete description of the standard toolbar buttons read the Toolbar Button Standard Definition chapter.
Report Menu Bar |
Description |
Open Report |
Opens the Search page in a state ready to run your report. Click Go to run the report. This will be greyed out in edit mode |
Run report |
Opens the Search page and runs the report. This will be greyed out in edit mode |
Editing Reports
Once a report is in edit mode the basic properties can be changed in the top section, all have drop down menus for the options available other than the report name which can be overwritten.

Use the tabs to add or change the conditions (see the Setting Search Conditions chapter for more information about conditions and how to edit them).

Use the tabs to change the columns that are viewed, what is viewed in them and how they are labeled. Here is the Group report version. The formatting is different for the Summary and List report versions.

The first column allows the user to add or delete columns from the report, the green + (to add one column), green tick (to add multiple columns, tick all columns required to be added then click OK), red - (to delete the current column). (see the Group Report chapter for more information on how they work)
The second column allows the user to change the properties that will be viewed in a column.
The third column allows the user to change the label at the top of the column in the report.
The fourth column allows the user to decide whether absolute values or data aggregation is required. See Summary Report chapter, Complex Content Types section for more information. If aggregation of the data has been chosen, then decide whether to ignore null (empty or 0) values.
If box marked Run report on a schedule is ticked, options allowing for the setting up of the scheduling of the report appear.
|
Run Now button to run the report now rather than wait for the scheduled time.
Choose whether to attach the report as a file to the email or whether the body of the email is the report data.
Choose the subject line to appear on the email. |
Select the Recipients tab to decide who to send the email to. |
|
Select the individual users the mail is to go to. |
|
Select the User Types the mail is to go to. The mail will be sent to all users of these types. |
|
Select the User Groups the mail is to go to. The mail will be sent to all users in these groups. |
|
Select the User Roles the mail is to go to. The mail will be sent to all users with these roles. |
|

Emails will only be sent to an address once. So if multiple users have the same email address or with your selections of Individual, Type, Group or Role you would have accessed a user multiple times, they will only get one email.
Select the When tab to schedule the report.
|
Next Send: The time and date the mail will next be sent with the current settings.
Last Sent: The time and date the report was last sent.
Select the frequency of the mail: Daily, Weekly, Monthly by Date, Monthly by Day, Yearly
Select when the emails will start
Specify the frequency: every other day, every third week etc.
Select when the emails will end if required. |

Select the Report Preamble tab to add some text to the detail of the email
|
Allows the addition of some text to the email detail.
|

Select the Export Settings tab to set up the format of the exported file.
|
1.Format: How the file will be formatted, choose between Comma Separated Values, Excel xls, Excel xlsx and Tab Separated Values. |
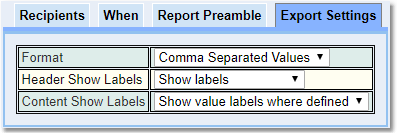
1.Header: What headings will be used, these can be Show labels or Show property names. Labels are those names that have been assigned by the administrator to a biskit type, the property name is the name of the property in the database.
2. Content: Whether enumerated types have their names shown, Show value labels where defined or the value as stored in the database, Show underlying data value.